Mastering Drum Brakes: A Comprehensive Guide for DIY Enthusiasts
Drum brakes may seem like a relic of the past, but they remain a vital component in many vehicles today. Whether you're a seasoned mechanic or a curious DIYer, understanding how drum brakes work and how to maintain them is essential. This guide will walk you through the ins and outs of drum brakes, from their components and functionality to step-by-step instructions for maintenance and repair. Let’s make learning about drum brakes both informative and fun!
TIPS AND TRICKS
Michael Winkler
4/4/20253 min read
What Are Drum Brakes?
Drum brakes are a type of braking system commonly found on the rear wheels of many vehicles. Unlike disc brakes, which use calipers and rotors, drum brakes rely on brake shoes pressing against the inside of a rotating drum to create friction and slow the vehicle.
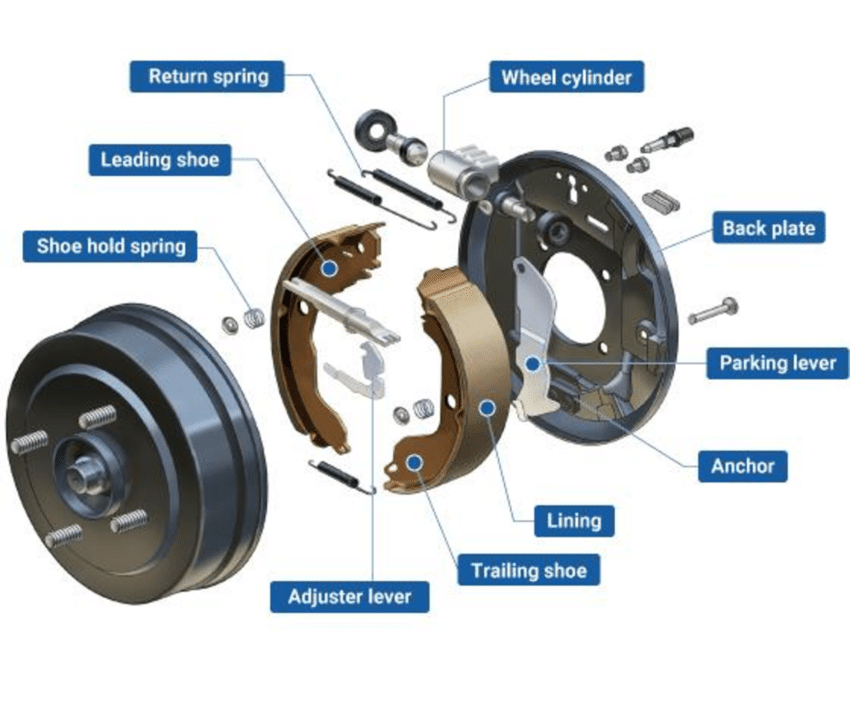
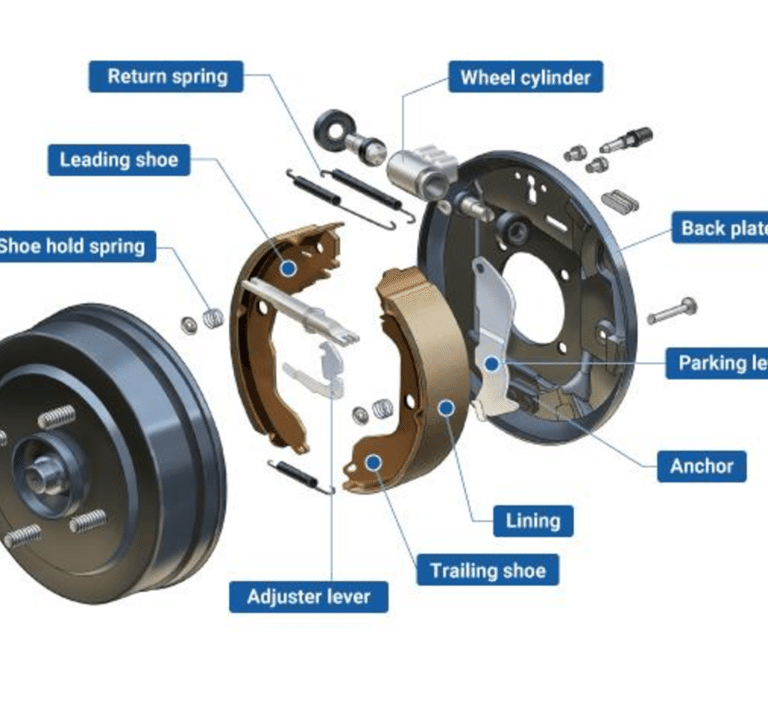
Key Components of Drum Brakes
Brake Drum: The rotating cylinder that the brake shoes press against to create friction.
Brake Shoes: Curved metal pieces with friction material that contact the drum.
Wheel Cylinder: Contains pistons that push the brake shoes outward when the brakes are applied.
Return Springs: Pull the brake shoes back to their resting position when the brakes are released.
Self-Adjuster: Maintains the correct distance between the brake shoes and the drum.
Parking Brake Mechanism: Engages the brake shoes to hold the vehicle stationary.
How Drum Brakes Work
When you press the brake pedal, hydraulic pressure from the master cylinder forces the pistons in the wheel cylinder to push the brake shoes outward. The shoes press against the inner surface of the drum, creating friction that slows the wheel's rotation. Once you release the pedal, the return springs pull the shoes back to their original position.
Advantages and Disadvantages of Drum Brakes
Advantages:
Cost-effective to manufacture and maintain.
Provide more braking force than similarly sized disc brakes.
Durable and long-lasting due to larger friction contact area.
Disadvantages:
Prone to overheating under heavy braking.
More complex and time-consuming to service compared to disc brakes.
Can lose efficiency when exposed to water or debris.
Step-by-Step Guide to Servicing Drum Brakes
1. Gather Your Tools
You'll need:
A jack and jack stands.
Lug wrench.
Brake cleaner.
Screwdrivers and pliers.
A drum brake spring tool.
A torque wrench.
2. Remove the Drum
Safely lift the vehicle and remove the wheel.
Gently tap the drum with a rubber mallet to loosen it. If it's stuck, use the adjuster to retract the brake shoes.
3. Inspect the Components
Check the brake shoes for wear and replace them if the friction material is less than 1/8 inch thick.
Inspect the drum for scoring or cracks.
Examine the springs and self-adjuster for damage or corrosion.
4. Disassemble the Drum Brake
Take reference photos of the assembly before removing any parts.
Use the spring tool to remove the return springs.
Detach the brake shoes, self-adjuster, and parking brake mechanism.
5. Clean and Lubricate
Spray brake cleaner to remove dust and debris.
Apply high-temperature grease to the contact points and adjuster threads.
6. Reassemble the Drum Brake
Install the new or cleaned components in reverse order, starting with the parking brake mechanism and self-adjuster.
Reattach the brake shoes and springs, ensuring everything is secure.
7. Adjust the Brake Shoes
Use the adjuster to set the shoes so they lightly contact the drum.
Spin the drum to ensure it moves freely without excessive resistance.
8. Test the Brakes
Reinstall the wheel and lower the vehicle.
Test the brakes at low speed to ensure proper functionality.
Common Issues and Troubleshooting
Squeaking or Grinding: Indicates worn shoes or a damaged drum.
Uneven Braking: Could be caused by a stuck wheel cylinder or misaligned shoes.
Soft Brake Pedal: May result from air in the brake lines or a failing wheel cylinder.
Fun Fact: The History of Drum Brakes
Drum brakes have been around since the early 1900s and were first used on horse-drawn carriages. Despite advancements in braking technology, they remain a reliable and cost-effective solution for many vehicles today.
When to Call a Professional
While many drum brake repairs can be done at home, some situations require professional expertise:
Persistent issues despite DIY efforts.
Advanced diagnostics for hydraulic or electronic components.
Repairs involving the parking brake mechanism.
Conclusion
Drum brakes may not be as flashy as their disc counterparts, but they play a crucial role in vehicle safety. By understanding their components and functionality, you can confidently tackle maintenance and repairs. Remember, patience and attention to detail are key when working on drum brakes. Happy wrenching!